Smashcake photoshoots are a blast! However, they can also be pretty pricey.
I could not bring myself to pay hundreds of dollars for a professional smashcake photoshoot for Will's first birthday. So instead I started creating a Pinterest board of all my favorite smashcake photos and set to work on creating my own smashcake photo session.
Supplies Needed:
-
Lighting & Location
- I used my dining room because it is near two huge windows for ample natural light; as well as wood floors for easy cleanup.
- I also used two continuous portrait lights for more lighting. Find similar lights here.
-
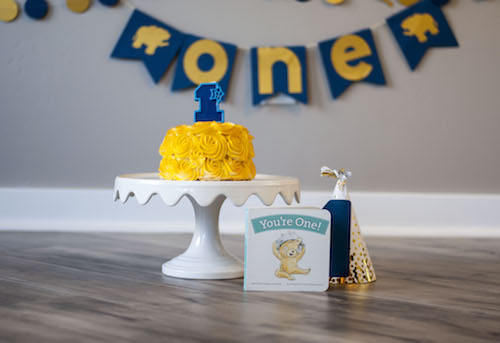
Bunting & Banners for backdrop
- I created my own 'one' banner and my own 'zoo animal & dot' bunting. I'll be posting tutorials on how to create both of these soon.
-
Cake Stand
- I received the cake stand that is pictured as wedding gift. Similar one here.
-
Smashcake
- I purchased my 5 inch, double layer, smashcake for $11 from Harmons! Order yours here.
-
Candle
-
Cleaning supplies
- Keep cleaning supplies near by for a quick cleanup once your munchkin has 'smashcaked' themselves out!
-
Camera
- Learn more about my camera equipment that I use here.
Note: you can add a huge variety of other props, banners, or bunting to your photoshoot. These are just the items that I used.
I used the additional props of a book and birthday hat. 'You're One' book pictured can be purchasedhere.
Steps to creating a photoshoot
- Move any furniture not needed for the shoot. I moved our dining room table for William's photoshoot.
- Hang banners & bunting. Tip: once you hang the banners take a look at your photoshoot area through your camera. This helped me to know where I needed to hang my banners and bunting so it would be visible in the shots.
- Incorporate props. I added in the cake stand and cake stand before adding William to the shoot.
- Take a few practice photos. I like to take a few practice photos and tweak my camera settings to my liking before adding in my subjects…especially very active subjects!
- Optional: Music. I turned on the 'Baby Einstein' Pandora station for William. He loves their songs and it instantly makes him smiley.
- Add your munchkin to the photoshoot area & snap away!
This was one of my favorite photoshoots I have ever taken of Will. He and I had a blast smashing his cake to pieces, and I got a good kick out of it as well.
Happy Smashcake Photoshoot!
Sarai Hansen
Lavendersblush.com
More From Blogher:
After An Autism Diagnosis: 13 Crucial Next Steps For Parents
Kids and 5Ks: When Your Child Wants to Run